Welcome to the exciting world of 3D modeling, where UV mapping is a very important skill that ensures your digital creations look realistic and detailed using textures and materials. UV mapping is a critical skill for beginners of Blender, most importantly because it allows one to achieve accurate texturing, where, after some time, one can wrap textures around the models.
Understanding UV Mapping in Blender
In this subtle yet significant world of 3D modeling, UV mapping is an essential technique between the simplified uniform models and their pulsating, textured counterparts. Correctly preparing your model from the start is necessary, and we will give you pointers on how to organize your model, setting you up for success as you step into the realm of detailed texturing.
What is UV Mapping, and Why is it Important?
- Definition: UV mapping refers to projecting a 2D image texture onto the surface of a 3D model. It is an essential point in the 3D modeling and texturing process.
- Adding Details: This method enables you to put details, textures, and colors into 3D models, turning them from simple meshes into complex, real creations.
- Realism and Appeal: The UV mapping makes the models appear more realistic and aesthetic and creates a better quality of digital art.
- Control Over Appearance: It gives artists and designers a very accurate definition of how textures will behave when they wrap around any model, and thus, all parts of the model surface behave as they were meant to.
- Essential Skill: Improving UV mapping is a crucial element of 3D modeling, as it can positively influence the final look of the work.
The Basics of Blender’s UV Mapping Interface
Blender offers an intuitive surface mapping interface for novices who can comfortably start with UV mapping using this interface. Learn how to operate the UV Editor that you will use to adjust your texture to align with the model’s surface.
Preparing Your Model for UV Mapping
Before proceeding with UV mapping, preparing the model correctly is crucial. This entails the preparation of a clean mesh and one that has been optimized for unwrapping. Such preparations eliminate problems and further provide a viable platform for UV mapping. For additional information, refer to the Complete Guide to Reducing Rendering Times in Blender, which also touches on issues related to model optimization.
Basic Techniques for UV Mapping in Blender
Indeed, when we proceed to the hands-on experience with UV mapping, it becomes apparent that a few essential skills can escalate the level of the work created. Mastering these fundamental methods, you can solve numerous texturing problems that immediately help you create balanced and wisely mapped models.
Simple Unwrapping Methods for Beginners
Beginners can choose from different unwrapping techniques available with Blender. Start small projects and eventually try more advanced models to unravel them better—high-quality texturing results from the efficiency and precision of unwrapping. Blender Shortcuts & Hotkeys can be managed to streamline your workflow.
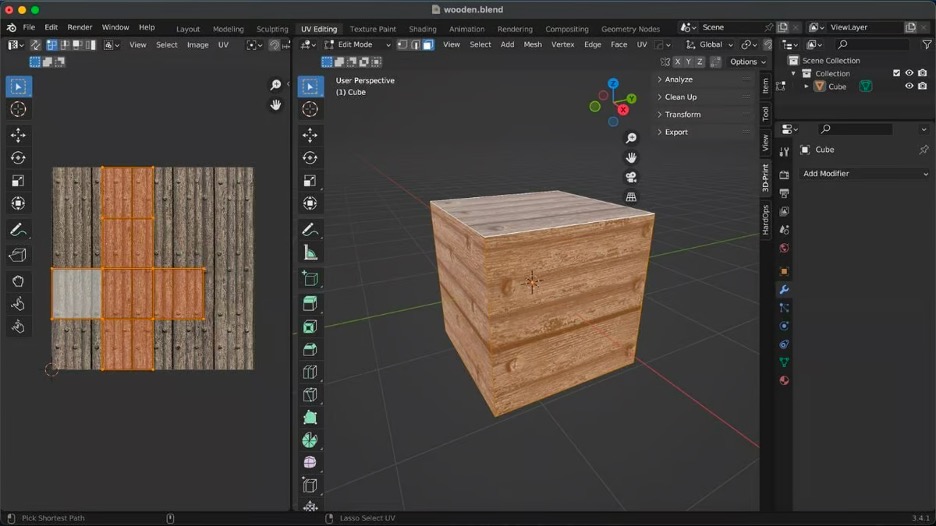
Aligning and Editing UVs in the UV Editor
After unboxing your model, the next step is to adjust and optimize your UVs using the UV Editor. This is an important step in properly placing the texture, ensuring that each texture aspect fits the 3D model precisely. Proper alignment is critical for optimal visual results. Understanding how to work with UVs in the UV Editor will give you more control in texturing so you can adjust textures to perfection.
Tips for Efficiently Organizing UV Layouts
Proper organization of your UV layouts is necessary to get the most out of your texture space. A good UV layout allows you to use textures as efficiently as possible, so it is helpful for the result of your model. For more reads, the Best Blender Assets could offer supplementary content for your projects. Apart from providing a better visual result for your models, the organized UV layouts also ensure textures are applied in the most resource-effective way, which is essential in complex scenes and higher texture resolution.
Texturing and Shading with UV Maps
Moving away from the fundamental components of UV mapping, we enter the world of texturing and shading. At this stage, your 3D models start breathing. This part is dedicated to using the texturing on top of your UV-mapped models and using Blender’s advanced shader system for realistic or stylized look results.
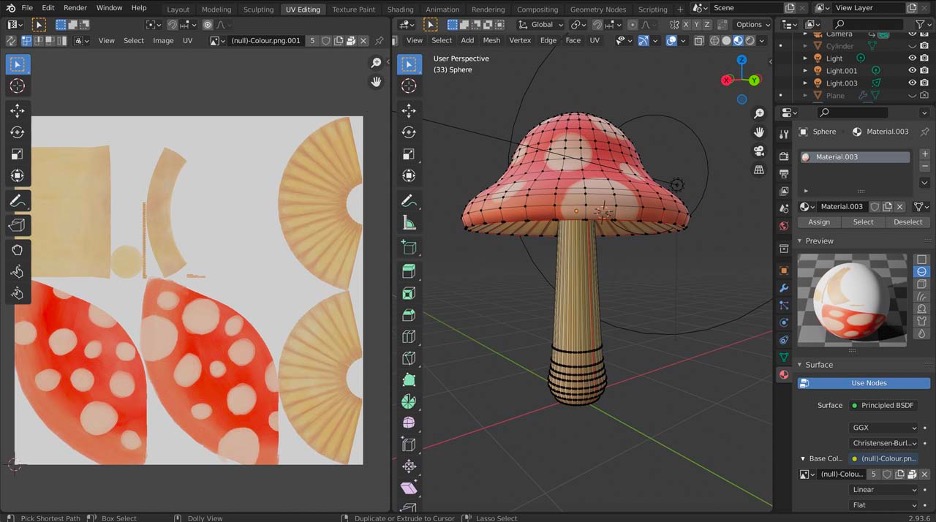
Applying Textures to UV Maps
With your UVs unwrapped and organized, the exciting part begins: texturing. This stage gives your models some life by giving them color, detail, and realness. The knowledge of how true texturing should be used is highly important for any 3D artist to produce compelling 3D art. Selecting the correct texture and ensuring they are applied correctly onto the mesh transforms this simple mesh into a visual masterpiece.
Using Blender’s Shaders with UV Mapped Models
The texture effects are dynamic and realistic in the shader system of the Blender. You can create many different visual styles and effects using shaders alongside UV maps, from a glossy, reflective surface to something coarse and textured. The Top Blender Plugins guide could serve as a further supplement to help you improve your texturing even more through more tools and features. Shaders are invaluable tools; once used efficiently, they can transform your models, filling them with depth and reality from subtle to breathtaking.
Adjusting Textures in the UV Editor for Better Results
In the UV Editor, you can alter the textures and notice your model’s major unexpected enhancing effects. Fine-tuning the placements and scaling of textures creates a work unparalleled in detail, helping to build a professional-looking result. To diagnose typical issues, see Common Problems of Blender and How to Troubleshoot Them.
Conclusion
This beginner’s guide to UV mapping in Blender has elaborated the basic principles and practices to get you started. Keep in mind that UV mapping mastery requires practice and trial and error. Experiment with various techniques, play with textures and keep honing your skills.
Having become acquainted with the fundamentals, it is high time that you should put your knowledge into practice. Start your UV mapping voyage with Blender at vagon.io, and note how your 3D modeling skills grow smarter. The journey to achieving stunning textured 3D models is on your tips.